I wanted to make something fun and flirty, yet sophisticated and came across this adorable cropped bustier top from a Polyvore post on Pinterest which can be found on House Of Fraser.
Hedonia top (see more crop shirts)
And thee end result... :) I tweaked the top a bit to make it my own. **Side note: The color is edited but surprisingly shows the actual color of the bustier. I went with a cream color instead of white because I am deathly afraid to get a white top dirty. Anywhom, the other photos I took with my iPhone is a lot lighter than the actual color.**
To start off, the main supplies you will need includes-- a tape measure, fabric cutting scissors, regular and fabric pencil, wrapping paper (I found it at the dollar store and is incredibly cheaper than buying sewing patterns) to make your own pattern, tape (since the wrapping paper liked to curl up so I taped it to the ground), and of course your fabric. I used a thicker cotton fabric for this top for the simplicity of sewing but of course use whatever works best for you.
After you have all of your supplies trace the patterns with your regular pencil onto the wrapping paper after carefully measuring the pieces of the top and then cut them out. What really helped me was taking a top that fit the way I liked it and traced around that top onto the wrapping paper. Afterwards, I separated the trace into sections so they can be sewed together in the end.
Once you have your patterns place it on top of the fabric and start dotting around the pattern onto the fabric with your fabric pencil. I gave about an inch of leeway to sew just in case because it is better to have too much fabric than not enough. Now cut out the fabric like so.
Pretty much at this point start sewing the pieces together. Since the fabric was creme colored you can see through it a tad bit so I used two layers for each pattern. I sewed the top and bottom of each pattern and flipped it right side out afterwards before sewing the left and right sides of the pieces all together. In addition, I added a lace trim to the bottom and the back to give it more elegance and detail. The back of this top are held together with eyes and hooks not the actual buttons that you see because those my friends are just sewed to the back for looks. :)
Anddd voila!
I will get a photo up soon with what you can pair this cute bustier top with so be sure to check back again for the update.
An enormous amount of time and patience went into this cropped bustier top-- believe me, it took about 2 hours just to get the correct patterns cut out from the wrapping paper, but once you get going it will all come together very nicely. After cutting out the pieces to the top I sewed them all together in less than an hour. The lace detail, eyes and hooks, and buttons took up more time than sewing the actual bustier. This sewing project may look intimidating but in reality it is not. Give it a go and if you have any questions feel free to contact me. :)
~8/11/12
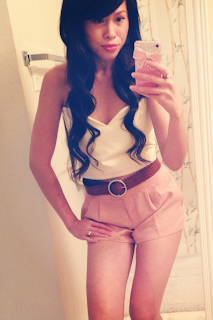
Anddd finally I have a photo of what I paired with this bustier:
High waisted blush shorts from Forever21!
For a simple and fun look colored pants such as coral, mint, pink, red and the list goes on can look absolutely adorable with this bustier. If you are going for a glamorous look then accessorize with a chunky necklace or chandelier earrings. So very versatile. :)


This is sooo nice I love it :) will try to do it and send you a personal mail. Thanks again :)
ReplyDeleteLOVE IT!!! How did you make the pattern pieces?
ReplyDeletei think it looks nice. it'd be a little easier to see if your hair wasn't blocking the shirt =/
ReplyDeleteVery nice!!! If it is possible can u explain how u add your measurements to the pattern???
ReplyDelete