Inspiration for all things pretty ♥

Wednesday, June 26, 2013

Romantic White Lace Romper

I absolutely adore rompers, I always have and always will! They look like dresses but gives you the comfort of shorts! I would not call this post a tutorial because to be honest this took me a couple days, and a couple of mess ups to get this right since after all it is my first romper I have ever made. I did take some photos that may give you some pointers for those who are familiar with sewing.


The fabric I used was lace, to be exact a lace curtain I found while thrifting. Yep. Haha. Lace is my absolute favorite to work with because even with how much you might mess up, your finish work always turns out amazing thanks to the details in the lace.


I used a pattern I have used in the past to make shorts to help me cut out the pieces for the shorts of the romper.


You should end up with four pieces, two for the front and two for the back. Sew the edges together where applicable.


These are my only pointers because I was more focused on trying to finish up my romper so I apologize! I was getting antsy to see the end results.


I made a top and attached the top to the shorts. I decided to make an open back with a button closure for cuteness factor. Haha.


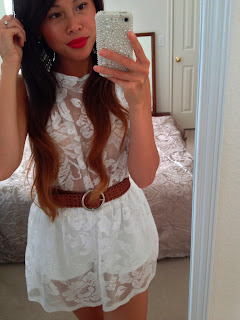
I am in love with how romantic this lace romper turned out to be.


I wore pearl chandelier earrings, a cognac belt and red lipstick since I wanted to keep this simple since the romper speaks for itself in the lace details.


This pretty baby will stay in my closet until I find a fancy occasion to wear this out. In the meantime I will gawk at its beauty. Haha. :)
Read More

Tuesday, June 25, 2013

If The Rumors Are True...

So I hear recently Google Friend Connect will be axed this July 1st which is less than a week away. Yikes! With the rumor mill, it has been said Google has been wanting to get rid of GFC for awhile now to encourage users to use Google+, but will they actually do it on July 1st? I guess we shall find out. I will be lying to myself if I did not mention I would be sad for my 300+ readers to be gone, but there are other ways to keep up to date with all of your favorite bloggers!

For my followers, if you are interested in keeping up to date with my posts after July 1st if GFC is really gone for good, then you can find me on Bloglovin' and Facebook! My icons are on the sidebar of my blog so you can easily click on those to follow me as well!


Here is the wonderful news about Bloglovin'! You can import YOUR blogs that you are following from GFC in to Bloglovin' so you will not lose any of the blogs you are following! So magnificent, yes! I already did this with all of my blogs that I follow and it was easy peasy.

If you already have Bloglovin' just click on the link below!

http://www.bloglovin.com/import/reader

If the link above does not work follow these simple steps:

1. Sign into Bloglovin'
2. Scroll down on your menu and go to SETTINGS
3. Under OTHER there should be an option to IMPORT BLOGS


If you do not have Bloglovin' I highly encourage you to get it because it is very user friendly. I hear they are improving their mobile app as well.

Well, let us all wish for the best because I know a lot of bloggers use GFC. It would be such a shame to lose all of our readers, but at least there are other options available like Bloglovin' and Facebook. Although I hope it not to be true, I would rather be safe than sorry so be sure to follow me on Bloglovin' and like my Facebook page! I hope to see all you lovelies on the other side!
Read More

Saturday, June 22, 2013

Darling Alteration: Bow Cropped Top!

I have been eying cropped tops for awhile now either through Pinterest or simply through online clothing sites. I am completely obsessed with their cuteness! With high waisted shorts in style for the summer I cannot help but to love the edginess cropped tops add to an outfit.


I took an old top I did not wear anymore because I did not like the way it fit, so I decided to cut it in half, hem the bottom and make it into a cropped top. Simple as that! The only semi-complicated thing was making the big bow to attach to the front.

I apologize the top is so wrinkled. Haha I threw it in a bag with a ton of other clothes I've been meaning to get around to altering.

1. Lay the top flat and even.


 2. Fold the top in half, or however cropped you want it to be, and then cut the top in half.


3. Hem the bottom of the top by folding in twice.


4. For the bow, which is optional, I used the bottom half of the top I cut to make it. I cut off the original bow because it was too thin and I wanted something that would make a statement. With the bow I made I had to iron the wrinkles out.


5. Align the bow however you would like on your cropped top and then sew it on. It doesn't have to be perfect because it's on the inside and nobody will ever see! :)


The finished cropped top!


I wore this lovely newly altered cropped top with my high waisted destroyed shorts I made from thrifted jeans. Here's my tutorial if you're wondering how I made them!

I rarely ever put my hair up, but the humidity is extremely horrible in the south and it destroys anything I try to attempt on my hair so I relied on a simple side bun. Definitely a look I will do all throughout summer because my hair needs a long rest from all of the heat. Haha.


Definitely my go-to outfit for this summer! For breezy nights wearing an oversized cardigan would be lovely as well. :) 
Read More

Monday, June 17, 2013

How To: Extreme Closet Reorganization!

A messy closet stresses me out, to the max! Haha. It stresses me out so bad that I had to just stay away from cleaning out my closet for awhile because I had so many other things I had to deal with before I took on this beast of a challenge. I'm not going to lie, I am a clean freak-- the freak of all clean freaks. For serious. I get so extremely stressed and anxious when things are not clean or in order.

One of the main reasons I wanted to organize my closet is that I felt like I NEVER had anything to wear. I get so frustrated because I have an endless amount of clothes in my closet. Ladies, we all know this feeling all too well! Since I was so tired of the clutter and frustration I decided to finally do something about it. I finally had some free time to tackle this mess of a closet of mine! I have officially banned myself from clothing shopping until further notice. Ohhh the problems of a bargainoholic. Hahaha! You will soon see why.

I shall show you some before photos. Don't judge me, please. Haha.


As you can see, my side of the closet had absolutely no more space to hang clothes that I began throwing items on the floor, with bags full of clothes too. So not like me but I had no choice! Mind you that underneath my first hangbar I have a shelf which was FULL of folded clothes as well, you just can't see it very well. Then underneath my bottom hangbar that was the case as well. Ai yi yi, I knowww! I feel my adrenaline spiking just thinking about it already.

First, I decided to just throw all of the folded items and items on the floor onto my bed. This was the only way I knew how to start and that way I can pick through what I wear regularly to what I rarely ever wear. With the clothes that are hung up I left them where they were and just went through each item to decide. My poor baby CoCo was stressing with me too. Bahaha! As you can see hangers and clothes are everywhereeee!


I neatly folded and bagged up the clothes I rarely ever wear. I couldn't get myself to throw away anything really, I'm such a hoarder and with my ability to alter clothing I say to myself that I may get to altering them sometime. I don't know when that time will be, that's my problem! Haha. I only threw away three tops that were really old and ugly, but everything else I organized them into bags and labeled them so whenever the season changes-- or my style changes I can go back and take them out.


I threw away a ton of hangers too, the clear plastic ones that I would get for free from random shops. I had no need for them and I wondered why I even kept them in the first place (it just took up space), but anyway haha, I have plenty of white and wooden hangers I have purchased to hang my clothes that I regularly wear.

After about four long hours I finally finished! Phew! And the after photos:


As you can see I finally have some extra space to hang more clothes in my closet! Woot! You can finally see my shelf and floor that was lost in the before photos. Hahahaha.


These are the 6 simple essential steps on how I managed to organize my closet:

1. BREATHE. Breathe in, breathe out. I'm not even kidding, it helps. Haha.
2. Remove: If your closet is a mess like mine, take most of the folded clothes out of your closet.
3. Decide Regular Vs. Rarely: I sifted through every single clothing item.
4. Organize: Bag up and label your clothes you rarely wear.
5. Purge: Throw away unnecessary items that you don't need in your closet or donate them!
6. Reward: Treat yourself to a job well done! Seriously it's excruciating organizing a cluttered closet!

Now I can happily walk into my closet and see that I have an array of clothes to wear! I smile at myself every single time. Haha! I limited my closet to the clothes I only regularly wear and it has helped me tremendously. I get ready in half the time I did before because before it was too cluttered for me to find anything. Simple is really amazingly better!

I was very proud of myself and SO extremely relieved! I will definitely maintain my closet after all the hard work and time I spent organizing it. Hopefully one day I will finally get the courage to purge all of the clothes I never wear, but that's another case on it's own. Bahaha. For now I am content with my simple, organized and lovely closet! Yaaay. :)
Read More

Monday, June 10, 2013

Lovely Tutorial: White Pleated Tea Party Dress

I have been in the mood to make dresses lately because in my opinion they are so much more fun, yet easy to make. This is a white pleated tea party dress I recently made.


There was a circle skirt tutorial that I stumbled upon while searching the web so I wanted to try for myself. Feel free to follow this link to get Kaysi's tutorial on how to make a circle skirt. I found it to be very helpful.

With a circle skirt I went ahead and attached a top to make a dress! It was that simple. So, let's get started.

The fabric I chose to work with a jersey knit that had cable knit patterns on it like a sweater. The fabric was very easy to work with and I did not even put a zipper on the dress because it stretched easily.


1. To make the circle skirt I traced a pattern on gift wrap paper so I can use to cut out my fabric. Use Kaysi's link I provided to get the correct measurements and to make the pattern.


2. Cut the fabric into the circle skirt. When you open it, it should look like the second photo.


 3. I added pleats because I wanted the dress to look flowy and light. I used pins to keep the pleats in place while I sewed.


4. Of course you can stop with just the skirt and then pair it with a top you already have. I went ahead and made a top to go with it. I went with a tank look, which I made free handed so I apologize for not having a tutorial on it, but I do have photos so I hope it helps. I wanted the back to plunge lower than the front to give it an edgy surprise.


5. Sew the top to the circle skirt bottom together and this is what you get!


I love the look of this dress because it's simple and elegant. I can easily dress it up or wear it plain. I wore a belt and then there's a few photos without the belt.


A perfect summer dress! I am already so in love with it. :)
Read More
Powered by Blogger.

© Classy Peach, AllRightsReserved.

Designed by ScreenWritersArena