Inspiration for all things pretty ♥

Monday, August 20, 2012

Lovely Tutorial: Window Valance To Boxy Scallop Lace Tank

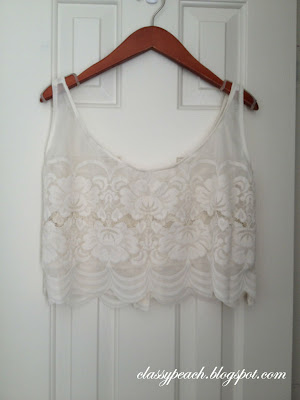
Yes, it is true. Home decor turned fashion! I turned an elegant lace window valance into a gorgeous boxy lace scallop tank.


I found this valance while I was shopping for $2 so of course I could not resist. You knowww. The lace is absolutely stunning might I add.


I cut the valance in half; one for the front of the tank, the other for the back. Then I half folded each fabric so it would be symmetrical and eyeballed and cut the pattern of the tank underneath the armpit and the neckline. What would be easier and what I usually do but was too lazy to do since I already envisioned something in my head, is find a tank that fits the way you would like it to and cut around it. With a little cutting and sewing...


This lovely boxy lace tank only took me about a total of 2 hours to make. It would have taken less time but my original heart shaped neckline did not turn out so I revised it into a round neckline. Still so simple and pretty. :)

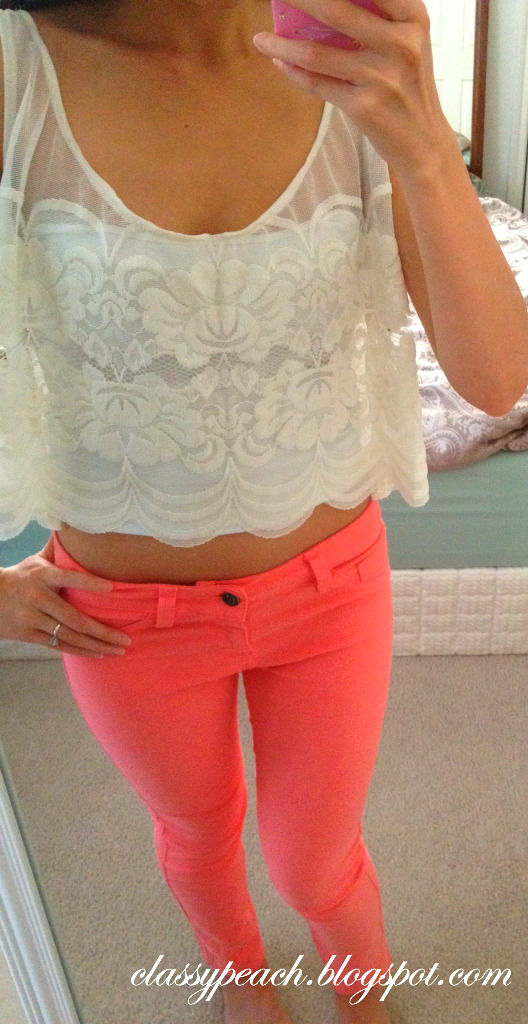
I paired this cute lace tank with my coral skinnys! And of course being silly makes the outfit that much better. Der.

The infamous duckface!


Bluesteel... with my puppy behind my legs!


Okay that is enough for now. Ha. A chunky necklace would look fantastic with this outfit as well but unfortunately I do not have one. Perhaps I shall make one soon... hrmmm. :)


I am super excoiitted to wear this out! :)


Read More

Sunday, August 19, 2012

New Hairss: Gradual & Natural Looking Ombre

I am currently obsessing over the ombre hairstyle although the style has been around since last year. I have always been so envious of those who dyed their hair since I have always wanted to dye my hair but never did because the thought of having black grow-out made me crinnggge. I wanted something different other than cutting my hair (in which I would never cut my long locks, ever! well for now) so coloring was the only other option. I have been wanting to ombre my hair for awhile now and I had put a lot of research into it through YouTube, google search, blogs and whatnot prior to coloring my hair on my own. The thing about ombre that I absolutely love is the fact I can keep my natural dark brown/black hair color at the top and dye the bottom lighter giving my hair the ombre effect.


These photos inspired me to finally do something different to my hair since I am a hair virgin. I found these photos on google search image therefore I do not claim these as my own.


This was the first time I dyed my hair and gutsy me decided to do it by myself since I did not want to spend the money to go to the salon-- big risk I know. I did not want to bleach my hair because the damage does not seem worth it to me so I went with hair dye instead which is less damaging. I chose to go with Garnier Nutrisse Ultra Color in B3 Golden Brown because I have read some awesome reviews about the brand. It is a line from Garnier specifically made to lighten dark hair up to 3 levels for medium brown to black hair. My hair fell under the dark to darkest brown on the haircolor chart on the box since my natural black hair lightened up quite a bit from being out in the sun.


My hair before:


I followed the instructions on how to mix the ingredients into the bottle provided in the box. The one thing I did not follow was the amount of time to leave the dye in my hair. It says to only leave it in for 20 minutes, but risky me decided to leave it in for 40 minutes instead since my hair was dark to begin with. I sectioned my hair in half then sectioned the halves into 3 different sections and started with my ends since that was what I wanted to be the lightest. I covered each section with foil after applying the dye then went on Pinterest for about 40 minutes just to kill time. After rinsing it out with warm water the first time I put more dye in the second time starting at the middle and covering everything below, again concentrating on my ends. I did not want to waste the hair dye so I used the whole bottle. Like I mentioned before, every hair is different so if your hair is lighter than dark to darkest brown you might need to leave the dye in for less than I did or use less dye in general.

And drum rollll...

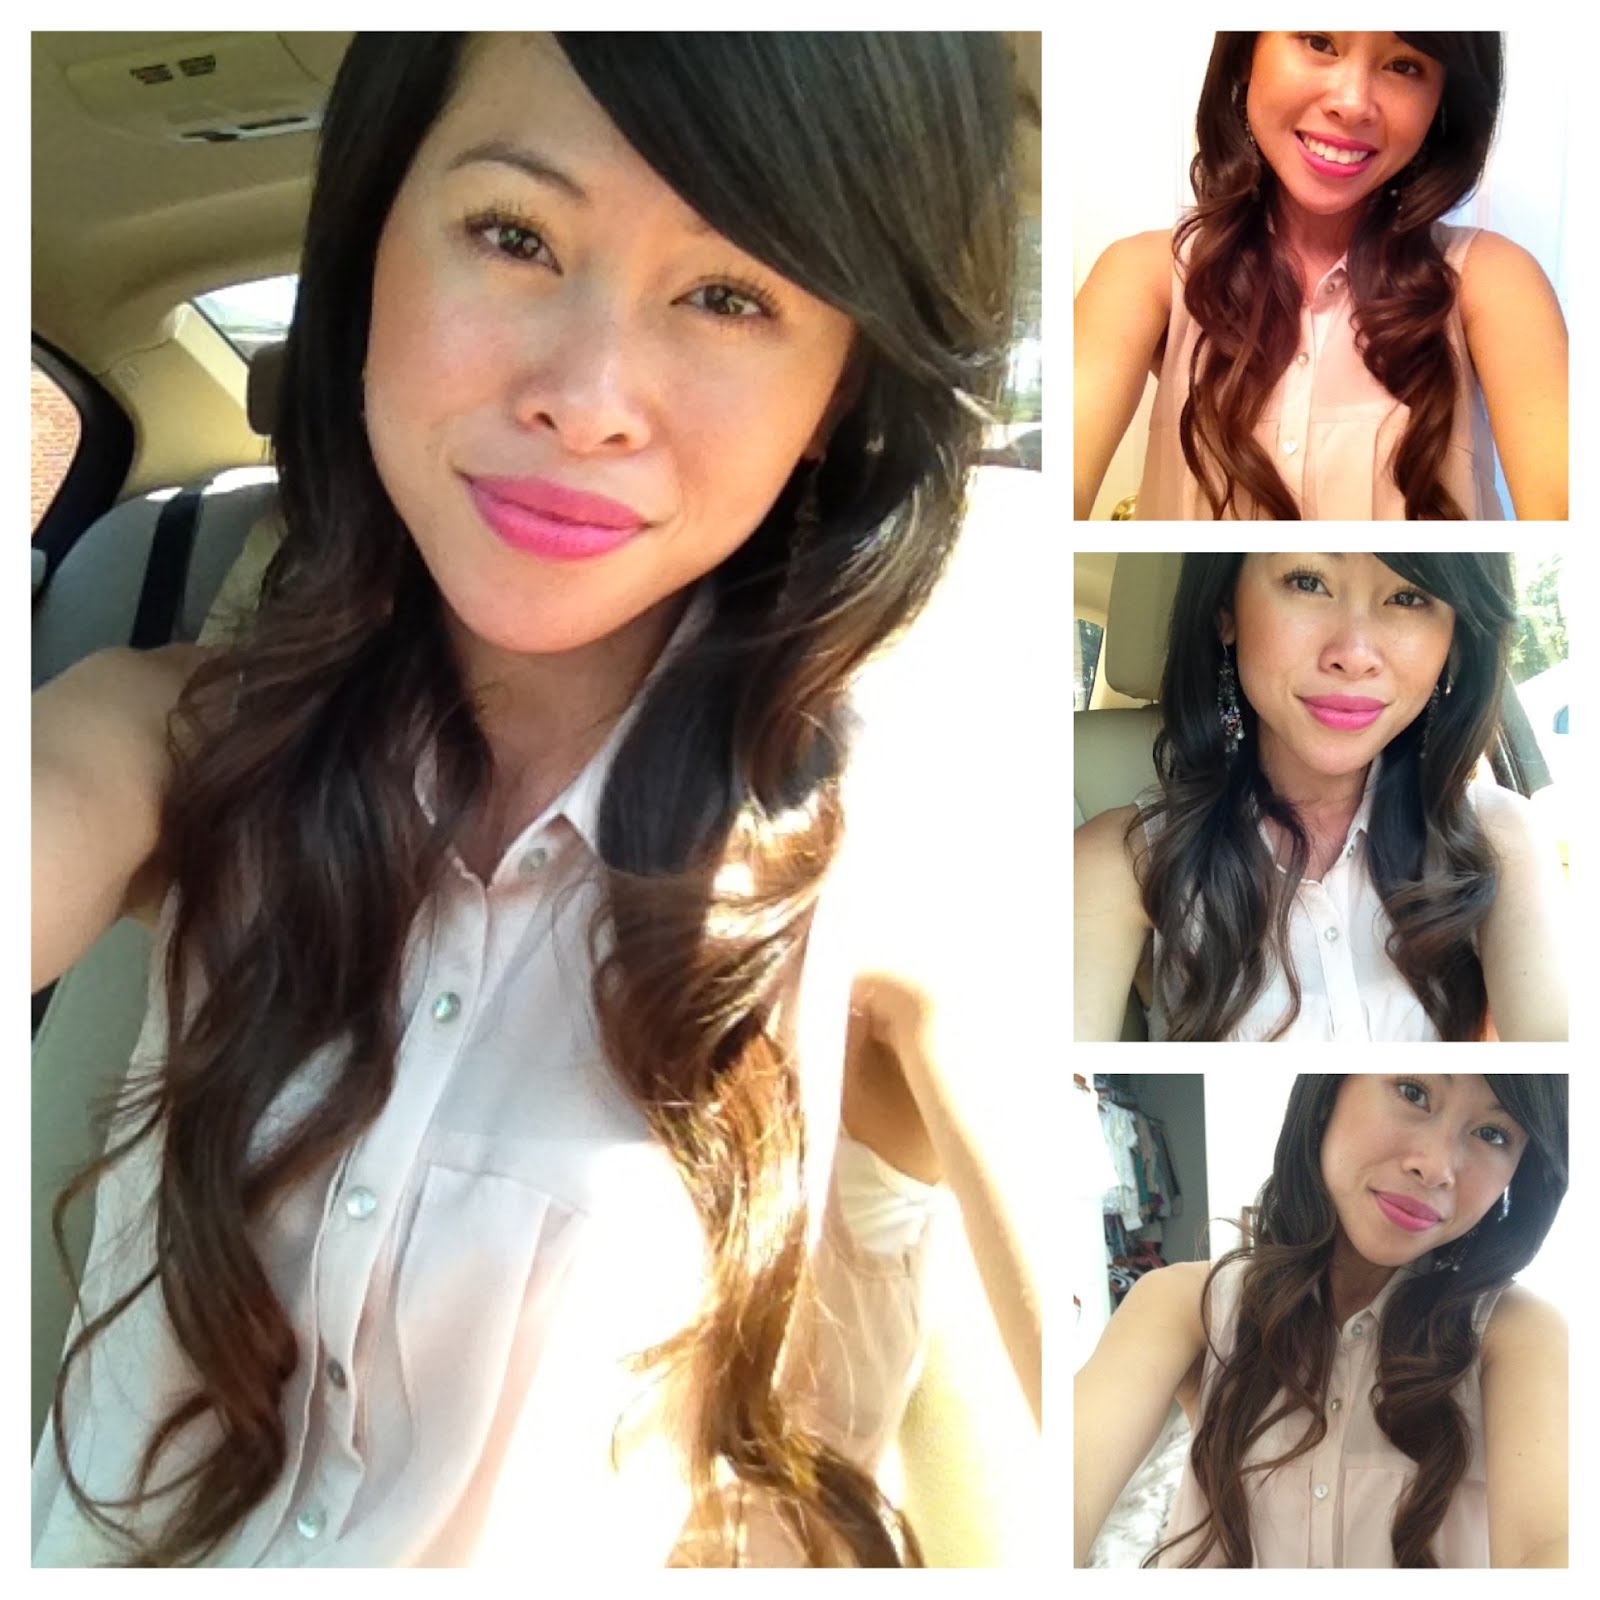
I absolutely adore the results! My hair turned out to be a reddish brown which I am very satisfied with. I took these photos in three different areas for lighting purposes because every light makes my hair look a different color; my bathroom, bedroom and car (since I figured it would look weird and vain to my neighbors if I just stood outside taking pictures of myself), all taken with my iPhone and it is not filtered or photoshopped whatsoever. One day I will learn how to use my husband's Canon to take better photos but for now these will do. The last photo is the comparison of the dyed hair to my original hair color.


I did not believe my hair could retain such color in a million years but thanks to Garnier Nutrisse I achieved the ombre I was hoping for! I have noticed zero damage from using this hair dye and the conditioner that comes with it works phenomenally. As you can see, I did not go toooo drastic with the ombre look since my natural hair color is on the darker side so I opted to go from my dark brown/black to a more light/reddish brown making my ombre more natural looking.

If you want to try to ombre your hair and do not have the experience I have read everywhere that the salon is the best bet to get exactly what you want. Through my research, I read that your hair can only go about 2 to 3 shades lighter than your natural color (without bleaching that is), but every hair reacts differently to hair dye even if it is the same color and buying the wrong dye can turn your dark hair orange. Yikes! Been there done that. I cannot guarantee you the results I have so do this at your own risk. Somehow I just got lucky.

So, after my risky experiment my virgin hair is virgin no more! Well the bottom half of it anyway. Oh, and except for the one time in high school my best friend and I decided to bleach a huge chunk of my bangs hoping it will turn blonde, but horrifically turned orange. Baha! Grand times. :)


Update: 9/19/12

The color has faded since and looks brighter in the sunlight. I looove it.


Read More

Sunday, August 12, 2012

Darling Alteration: Coral High Low Maxi Skirt

As you can obviously see I am in the 'high low' obsession stage because of my previous post of my white high low tank dress and now... a coral high low maxi skirt! I looove the elegant and whimsical effect and I cannot get enough of it. I found this maxi skirt while shopping that was a size 24W for $4 (I could not say no)-- I knew it would not fit but of course an alteration was in store for this beautiful coral maxi skirt.


Before:


Here is the picture of the cutting process to make the high low effect I promised I would take a photo of from my previous high low post. The seam you see is the side of the skirt. I am such a little shortie (5'1") that I started my cut very high in the front of the skirt making the length high above the knees to elongate my legs. Remember to cut a little at a time until it fits you well or when you finally achieve the appropriate length.


So very simple and once the skirt is cut you can start sewing up the edges. Since it was a size 24w I had to also alter the waist. Instead of cutting away at the fabric to make the skirt smaller, I used an elastic band and inserted it inside the fabric of the waist to add more ripples in the skirt giving it a more playful flow.

The impeccable results:


I paired this pretty coral high low maxi skirt with a cream lace top and a brown skinny belt. I am also wearing bronze and forest green gem drop chandelier earrings but you cannot see it clearly in the photo because my hair is covering it up. Oops.


A fabulous outfit to go shopping in or on a romantic evening out. ♥


Read More

Thursday, August 9, 2012

Darling Alteration: White High Low Tank Dress

When I came across this adorable high low tank dress on Pinterest I knew I had to make it. Some way, somehow. And I did!


Similar, huh?


I am not certain where you find this actual dress, unfortunately. I tried to research into it without any luck whatsoever.

So anyway, as I was browsing around at Goodwill I found this less than attractive dress in a size 8 for $3.99. You cannot beat the price since fabrics can be expensive and it struck me immediately that I could easily alter it to look like the high low tank dress above. I was so excited. This is what I started out with--


First, I laid the dress evenly flat on the ground with the front facing up and laid a loose fitting tank on top so I could cut out the tank shape for the dress. For the high low effect I laid the dress down flat on the ground to where the front of the dress is to my right and the back is to my left-- making sure it is centered correctly on both sides of the front and back. I started to cut both layers of the front, cutting in a straight line to where I wanted the length of the front of the dress to be at which gave me the 'high' look. Slowly I started curving downwards as I cut diagonally towards the back and cutting less fabric which gave me the 'low' look. Kind of like cutting a curvy 'half hill' which is the best way I can describe it. Cut only a little at a time, try on the dress and slowly cut more and more until it fits well. The edges will be rough, but that is where the sewing will come into effect.

This alteration was very simple and easy although my explanation may not be. I should have taken a picture to illustrate the cut, but I shall take a picture next time with the high low skirt I am making.


Begin sewing by folding in the edges twice and sew about a centimeter in for the hem of the neckline, the arms and bottom of the dress. Anddd taaa-daaa! Thee finished dress.


Who would have guessed. ;) The high low tank dress is meant to be loose fitting because when you throw on a cute belt it will give you a lovely hourglass figure and a beautiful flow. I accessorized with bronze leafy earrings and would have thrown on a chunky necklace if I had one. I am completely in love with this dress because it screams simple elegance.

Read More

Wednesday, August 1, 2012

Lovely Tutorial: Cropped Bustier Top

So, this is officially my first sewing project after a year and a half break.


I wanted to make something fun and flirty, yet sophisticated and came across this adorable cropped bustier top from a Polyvore post on Pinterest which can be found on House Of Fraser.

Hedonia top


And thee end result... :) I tweaked the top a bit to make it my own. **Side note: The color is edited but surprisingly shows the actual color of the bustier. I went with a cream color instead of white because I am deathly afraid to get a white top dirty. Anywhom, the other photos I took with my iPhone is a lot lighter than the actual color.**


To start off, the main supplies you will need includes-- a tape measure, fabric cutting scissors, regular and fabric pencil, wrapping paper (I found it at the dollar store and is incredibly cheaper than buying sewing patterns) to make your own pattern, tape (since the wrapping paper liked to curl up so I taped it to the ground), and of course your fabric. I used a thicker cotton fabric for this top for the simplicity of sewing but of course use whatever works best for you.


After you have all of your supplies trace the patterns with your regular pencil onto the wrapping paper after carefully measuring the pieces of the top and then cut them out. What really helped me was taking a top that fit the way I liked it and traced around that top onto the wrapping paper. Afterwards, I separated the trace into sections so they can be sewed together in the end.


Once you have your patterns place it on top of the fabric and start dotting around the pattern onto the fabric with your fabric pencil. I gave about an inch of leeway to sew just in case because it is better to have too much fabric than not enough. Now cut out the fabric like so.


Pretty much at this point start sewing the pieces together. Since the fabric was creme colored you can see through it a tad bit so I used two layers for each pattern. I sewed the top and bottom of each pattern and flipped it right side out afterwards before sewing the left and right sides of the pieces all together. In addition, I added a lace trim to the bottom and the back to give it more elegance and detail. The back of this top are held together with eyes and hooks not the actual buttons that you see because those my friends are just sewed to the back for looks. :)


Anddd voila!


I will get a photo up soon with what you can pair this cute bustier top with so be sure to check back again for the update.

An enormous amount of time and patience went into this cropped bustier top-- believe me, it took about 2 hours just to get the correct patterns cut out from the wrapping paper, but once you get going it will all come together very nicely. After cutting out the pieces to the top I sewed them all together in less than an hour. The lace detail, eyes and hooks, and buttons took up more time than sewing the actual bustier. This sewing project may look intimidating but in reality it is not. Give it a go and if you have any questions feel free to contact me. :)

~8/11/12

Anddd finally I have a photo of what I paired with this bustier:

High waisted blush shorts from Forever21!


For a simple and fun look colored pants such as coral, mint, pink, red and the list goes on can look absolutely adorable with this bustier. If you are going for a glamorous look then accessorize with a chunky necklace or chandelier earrings. So very versatile. :)


Read More
Powered by Blogger.

© Classy Peach, AllRightsReserved.

Designed by ScreenWritersArena