Inspiration for all things pretty ♥

Saturday, October 6, 2012

Beauty In The Horizon

I spend a lot of time brainstorming new DIY projects or designs/alterations, therefore, in the meantime I decided I really like to share photos I love.

I've compiled some photos I took with my iPhone of breathtaking sunrises and sunsets I've experienced recently. Nature reveals such an awestruck beauty every morning through its colors and textures. I will never everrr get tired of seeing such a beautiful view.

All of these photos are unfiltered and most are captured from my balcony. There was definitely no photoshop needed for these amazing sights.

Incredible sunrises...


This photo was taken on a morning drive.


Incredible sunsets...


Sunsets in Wichita Falls, TX... I have never seen sun rays this magnificent in my entire life. I was speechless.


Gorgeous moments in nature paralyzes me and puts me in such a trance, yet somehow I manage to capture it. I think I should become a professional iPhone photographer, don't ya think? :P
Read More

Thursday, October 4, 2012

Then Versus Now

As I was cleaning out my iPhoto (I have over 3,000 photos on there. Yikes!) I ran across this photo of me in 2006 when I was only 18 years old. Golly. I was a beebeee! Haha.


I was obsessed with eyeliner at the time as you can see and lipgloss. Had to have lipgloss on 24/7. Haha. :P

Now I'm loving the more natural look on me. I prefer accentuating my lashes to give it a fuller thicker look without having to use eyeliner.


Sometimes when I'm on a crunch for time I bare it all out and only wear lipstick. I HAVE to at least have lipstick on to leave the house. It's a makeup must for me. :)


Mascara, blush, and lipstick. That's all I truly need.


What are your makeup musts? :)


Read More

Wednesday, October 3, 2012

A Little Bit About My World

Capturing all the special and pretty moments on my iPhone is one of my favorite things to do. I'm no photographer so I like using my iPhone since it's so convenient. I just want to share some photos from throughout the year that I love. :)

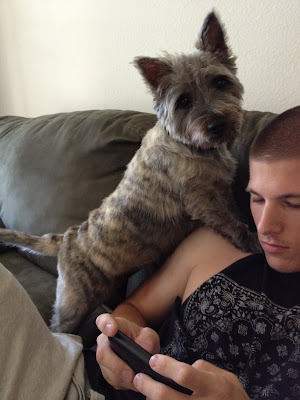
My beebs and little furry baby girl, CoCo. She's a cairn terrier-- yes, like Toto but a girl. She has the biggest attitude in the world, I kid you not, but I love her so.


When she finally got her haircut. You can see her rolls. Haha.


This is her now. She's so silly and loves her Daddy dearly. She has to be right by him at all times possible. Definitely Daddy's little girl.


The most wonderful man, evar! Brian and I went to Dallas, TX to see Medieval Times back in March. It was a magnificent show and I very much want to go again!


Two summer's ago in Wichita Falls, TX.


At a drifting event in Louisiana last month.


My besthh freddd and I being silly willy nilly doots. My hetero-lifemate, my Gertrude, my BFFE. She is so phenomenal and I love and miss her so much! We live soo far away from one another, but soon we shall be reunited for good!


Sunbathing is so relaxing and I do it every now and then. I don't want to damage my skin too much. ;)


Bonfires are the bestest in Washington. Smores are even better! Yummm.


I miss Seattle and it's beautiful city lights at night.


Our recent trip to Dallas/Ft Worth, TX.


I hope to travel to many more places while we are living in the south. New adventures are rather exciting.


I know this was a lot of randomness, but it's a little bit more about me and my world. That is all for now. :)


Read More

Monday, October 1, 2012

Marvelous Accessories DIY: Floral Statement Necklace

Statement necklaces are a must in my wardrobe and ironically I don't have very many. I have about 2 since I feel some of them are waaay too expensive and I don't have that kind of money to spend on a necklace. My solution-- I decided to use some of the little fabric scraps from my other designs and alterations I made to make my own statement necklace. I knew there was a reason I kept the scraps!


These are the supplies you'll need. Needle, thread, scissors and a ribbon of some sort (your preference). The ribbon I used was from a shirt.


And don't forget your scraps. I wasn't joking when I said I kept a lot of them. Haha!


Start off by taking a piece of scrap fabric and fold it half, then half it again. Twist around your finger and then flatten it. Remember you don't have to be perfect with the flower because it looks better messy. I used the same fabric but you can definitely mix and match fabrics for different color and texture.


Take your needle and thread and sew right through the center to the other side. Repeat several times at different angles then sew the back together just so the fabric doesn't fall apart. Easy right?


Once you get enough flowers for your necklace position them however you'd like the necklace to look like.


Turn the flowers over to the back side and sew them together one by one.


Sew the ribbon on both sides then tie to two free ends into a pretty bow. The great thing about the ribbon is that you can adjust to length however you like to make a long or short necklace.


Voilaa!


Such a pretty floral statement necklace made out of fabric scraps, huh? I wore it with a simple coral silk tank to add more pizazz. Loves it. :)


Read More

Thursday, September 27, 2012

Marvelous Accessories DIY: Wire Rings

Thin stacked rings are the new rage and I have fallen victim to them. As I was browsing on the web I found this amazing blog which inspired me to do this project: wire rings! Check out her incredible blog I Spy DIY! It's somewhat similar to thin stacked rings and very cute when you make several of them.

I created this heart ring which was inspired from Jenni's blog. Visit her blog to find the tutorial. Afterwards, I experimented a little bit and created the swirl rings.


So, I shall show you how to make the swirl rings. I used 20 gauge aluminum wire I bought from Hobby Lobby for $2, long nose pliers to bend the wire, and diagonal pliers to cut it.


First, cut a piece of wire about four times the circumference of your finger since you want extra wire than not enough wire. Use your pliers to twist one small swirl. The aluminum wire I purchased was really easy to bend so I used my hands to complete the swirls after I did the first one with the pliers.


Try it on your finger you wish to wear it on and adjust the wire to fit your finger. Use your pliers again to make a little swirl for the back of the ring to complete it.


And finished! So simple and easy to make that I made two.


I purchased bronze wire as well so I'm excited to experiment some more with these wires and turn them into amazing accessoriesss!


Read More
Powered by Blogger.

© Classy Peach, AllRightsReserved.

Designed by ScreenWritersArena