Inspiration for all things pretty ♥

Thursday, August 9, 2012

Darling Alteration: White High Low Tank Dress

When I came across this adorable high low tank dress on Pinterest I knew I had to make it. Some way, somehow. And I did!


Similar, huh?


I am not certain where you find this actual dress, unfortunately. I tried to research into it without any luck whatsoever.

So anyway, as I was browsing around at Goodwill I found this less than attractive dress in a size 8 for $3.99. You cannot beat the price since fabrics can be expensive and it struck me immediately that I could easily alter it to look like the high low tank dress above. I was so excited. This is what I started out with--


First, I laid the dress evenly flat on the ground with the front facing up and laid a loose fitting tank on top so I could cut out the tank shape for the dress. For the high low effect I laid the dress down flat on the ground to where the front of the dress is to my right and the back is to my left-- making sure it is centered correctly on both sides of the front and back. I started to cut both layers of the front, cutting in a straight line to where I wanted the length of the front of the dress to be at which gave me the 'high' look. Slowly I started curving downwards as I cut diagonally towards the back and cutting less fabric which gave me the 'low' look. Kind of like cutting a curvy 'half hill' which is the best way I can describe it. Cut only a little at a time, try on the dress and slowly cut more and more until it fits well. The edges will be rough, but that is where the sewing will come into effect.

This alteration was very simple and easy although my explanation may not be. I should have taken a picture to illustrate the cut, but I shall take a picture next time with the high low skirt I am making.


Begin sewing by folding in the edges twice and sew about a centimeter in for the hem of the neckline, the arms and bottom of the dress. Anddd taaa-daaa! Thee finished dress.


Who would have guessed. ;) The high low tank dress is meant to be loose fitting because when you throw on a cute belt it will give you a lovely hourglass figure and a beautiful flow. I accessorized with bronze leafy earrings and would have thrown on a chunky necklace if I had one. I am completely in love with this dress because it screams simple elegance.

Read More

Wednesday, August 1, 2012

Lovely Tutorial: Cropped Bustier Top

So, this is officially my first sewing project after a year and a half break.


I wanted to make something fun and flirty, yet sophisticated and came across this adorable cropped bustier top from a Polyvore post on Pinterest which can be found on House Of Fraser.

Hedonia top


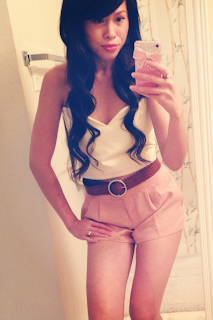
And thee end result... :) I tweaked the top a bit to make it my own. **Side note: The color is edited but surprisingly shows the actual color of the bustier. I went with a cream color instead of white because I am deathly afraid to get a white top dirty. Anywhom, the other photos I took with my iPhone is a lot lighter than the actual color.**


To start off, the main supplies you will need includes-- a tape measure, fabric cutting scissors, regular and fabric pencil, wrapping paper (I found it at the dollar store and is incredibly cheaper than buying sewing patterns) to make your own pattern, tape (since the wrapping paper liked to curl up so I taped it to the ground), and of course your fabric. I used a thicker cotton fabric for this top for the simplicity of sewing but of course use whatever works best for you.


After you have all of your supplies trace the patterns with your regular pencil onto the wrapping paper after carefully measuring the pieces of the top and then cut them out. What really helped me was taking a top that fit the way I liked it and traced around that top onto the wrapping paper. Afterwards, I separated the trace into sections so they can be sewed together in the end.


Once you have your patterns place it on top of the fabric and start dotting around the pattern onto the fabric with your fabric pencil. I gave about an inch of leeway to sew just in case because it is better to have too much fabric than not enough. Now cut out the fabric like so.


Pretty much at this point start sewing the pieces together. Since the fabric was creme colored you can see through it a tad bit so I used two layers for each pattern. I sewed the top and bottom of each pattern and flipped it right side out afterwards before sewing the left and right sides of the pieces all together. In addition, I added a lace trim to the bottom and the back to give it more elegance and detail. The back of this top are held together with eyes and hooks not the actual buttons that you see because those my friends are just sewed to the back for looks. :)


Anddd voila!


I will get a photo up soon with what you can pair this cute bustier top with so be sure to check back again for the update.

An enormous amount of time and patience went into this cropped bustier top-- believe me, it took about 2 hours just to get the correct patterns cut out from the wrapping paper, but once you get going it will all come together very nicely. After cutting out the pieces to the top I sewed them all together in less than an hour. The lace detail, eyes and hooks, and buttons took up more time than sewing the actual bustier. This sewing project may look intimidating but in reality it is not. Give it a go and if you have any questions feel free to contact me. :)

~8/11/12

Anddd finally I have a photo of what I paired with this bustier:

High waisted blush shorts from Forever21!


For a simple and fun look colored pants such as coral, mint, pink, red and the list goes on can look absolutely adorable with this bustier. If you are going for a glamorous look then accessorize with a chunky necklace or chandelier earrings. So very versatile. :)


Read More

Thursday, July 26, 2012

Pretty Things: Bargains Galore

I am the ultimate bargain shopper-- with no exaggeration whatsoever I live and breathe bargains whenever and wherever I go shopping. Truth. I believe designer labels are highly over-rated unless it is a one of a kind, ridiculously amazing piece that you cannot find anywhere else. Otherwise I love looking trendy without spending an excessive amount of money which also gives me a leeway to shop more often and getting more fabulous stuff. Shweet! More for your money, I say! Here are a couple of my recent favorite (and cheap) finds.

Taupe strappy wedges By Guess from Ross: $27.00


Lauren Conrad nude platform high heels from Kohl's: about $8 on clearance... for realz.


I have never shopped at a thrift store until just recently when I was curious of what Goodwill carried and lo and behold I came across this amazing purse. Only $3.49! I have a new outlook on thrift stores after finding this gem and I get compliments on it all the time. After my experience I can vouch that they carry very unique and rare items sometimes. One person's trash is another person's treasure. :)


Read More

Wednesday, July 25, 2012

Sew Fabulous!

I finallyyy received a sewing machine as a gift from my husband for my birthday and gotten the opportunity to set up my sewing station a couple days ago. YaAHH. No doubt it is a mess, but it is surely a beautiful mess. I am a self-taught sewer through researching tutorials on blogs, YouTube and general 'how-to' instructions online since I was a freshman in highschool. Sewing has been and always will be an enormous passion of mine. It has been roughly over a year since I have made my own clothes so I am definitely overdue to refresh my sewing skills. It is time to make some pretty clothes!


Read More

Friday, April 20, 2012

Fabulous DIY: Pretty Peonies

Flowers are an easy way to add elegance to your home without much effort. Instead of going out and purchasing flowers I decided I would make them since it would give me something creative to do. After all, I LOVE projects like no other. They are so simple to make and took no time at all-- heck, I made about four of these babies in less than an hour. These peonies are made out of coffee filters, floral wire and tape and you guessed it, all from the Dollar Store. Flowers that will last a lifetime without watering-- I really like that idea. :)

Here is my inspiration. Have funsies, my friends!


Read More

Wednesday, April 18, 2012

Fabulous DIY: Beaded Chandelier

I have a crazy obsession with chandeliers, but purchasing one at the store can be an expensive ordeal. Thanks to Pinterest I stumbled upon this genius DIY of a beaded chandelier made completely out of Dollar Tree supplies. Who would have thunk it! This project definitely takes a good amount of time and patience, but the end result is phenomenal. If you want to learn more about making this beautifully unique chandelier visit this website.

There are endless amounts of craft ideas for those who enjoy making their own home interior decorations for cheap. And let's face it, we all love to save some money when possilbe. :)


Read More
Powered by Blogger.

© Classy Peach, AllRightsReserved.

Designed by ScreenWritersArena