Wednesday, February 27, 2013

Lovely Tutorial: High Waisted Destroyed Cut Off Shorts

I've been obsessing over the high waisted denim shorts trend lately. So 80's and so cute! I decided I wanted to make a pair myself since I didn't want to shell out $50 for a pair in the store. So let's get started!


I went to Goodwill and found a pair of Lawman ladie's jeans for $3.50. You can't beat that. Also, if you mess up you won't feel so horrible about destroying a pair of jeans you bought for so cheap compared to vice versa. Haha. If you happen to have a pair of old jeans by all means use them!


You'll need scissors. I used a big pair and small pair of fabric scissors, also a pair of tweezers which isn't in the photo below.


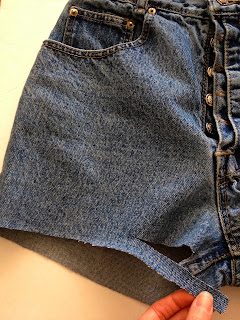
Take your scissors and cut off the pant legs. Be sure to give yourself some room to cut more off as you try them on to find the right length for you. Start cutting inch by inch until you get your desired length.


Fold the shorts in half to make sure both sides are symmetrical.


You can leave your jean shorts just like so if you don't like destroyed denim. I, however, am addicted to destroyed denim. I think it adds a bit of spunk to any outfit. The process is a little tideous, but if you want them you'll find time to do it. :)

Fold the shorts in half wherever you want them to be destroyed. Make sure NOT to cut the pockets if you want to use them. Cut about 1 cm apart from each other like so:


I washed and dried my shorts before I used tweezers to pull apart at the destroyed part. The downside to washing before pulling the little threads out is that it left holes in my shorts where it should be destroyed. I learned to love it anyway, but if you don't want holes please do this process before you wash and dry them to get the white string effect.


This is the other side that has the destroyed holes.


Important! Like I said you can follow my process of washing and drying it first before pulling out the threads to get my exact look. If you don't like the holes pull the threads first before washing and drying to more likely prevent them, but I can't guarantee it won't happen.

After you wash and dry you should get the fraying at the bottom as well. You can trim the frays to your preference. This is how mine turned out after everything is done.


I would have to say pulling out the threads of the shorts to get the destroyed look took about half an hour to do. After you get the first one going the other ones get easier to do. I love love love these shorts so much! I see them all over Pinterest and now I have a pair of my own! Yaaya!

For this outfit I wore a leopard print chiffon & lace tank with sandals, peach chandelier earrings, and my big coral bow ring from my DIY tutorial. These shorts fit a little loose on me, but I really don't mind. Heck I saved a ton of money and I can say I made them! :)


One of my favorite looks for this coming up spring and summer. The weather really needs to start warming up! If you try this, let me know how it turns out for you!


Thursday, February 21, 2013

Lovely Tutorial: Ivory Peplum Top

I've been admiring peplum tops for quite some time now, but I never got around to purchasing one. I found this great fabric from Walmart for only $1.50 a yard and knew it was perfect for a peplum top. I think I saved about $40 by making one instead. ;)


My lovely inspiration I found on Pinterest. :)


I started out with making the patterns. I took a top and traced around it onto the paper. The pattern is just half of what it's suppose to be since you have to fold the actual fabric in half when you cut so it comes out symmetrical.


Then I went ahead and cut out the fabric and pinned it on my mannequin.


I hemmed the edges and added an exposed zipper in the back.


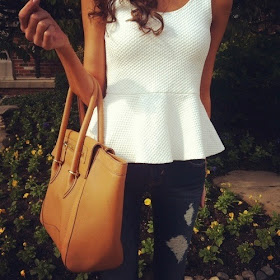
For my outfit I wore dark denim jeans, my natural t-strap heels, and pearl chandelier earrings. I could easily dress up this peplum top a little more by adding a sweet statement necklace.


I adore simple outfits so much! Sometimes less is more. ;)


Tuesday, February 12, 2013

Rainy Days: Cozy and Casual

Rainy days are the perfect days to layer like crazy. In addition to being sick... waahhh :(, I tried to do my best not to look horrible even though I feel like absolute doo doo.

For this casual outfit I wore a tiered stripe long sleeve top, beige cardigan, and light jeans. I threw my hair in a messy side braid since I was too lazy to do anything else.

Striped Tiered Top-- Brand: Apostrophe, From: Sears


Beige Cardigan-- From: Old Navy
 
Light Wash Jeans-- From: Hollister


I accessorized with my rose gold Fossil watch my honey bought me for Christmas, cream/orange/gold pearl chandelier earrings, and my cognac boots. Boots are the best for rainy days!

Rose Gold Watch-- Brand: Fossil, From: Dillard's

Chandelier Earrings-- From: Forever 21

Cognac Wedge Boots-- Brand: Mix No 6, From: DSW


With such yucky weather I always like to layer, stay warm and of course fashionable. ;)

What's your favorite outfit for rainy days? :)